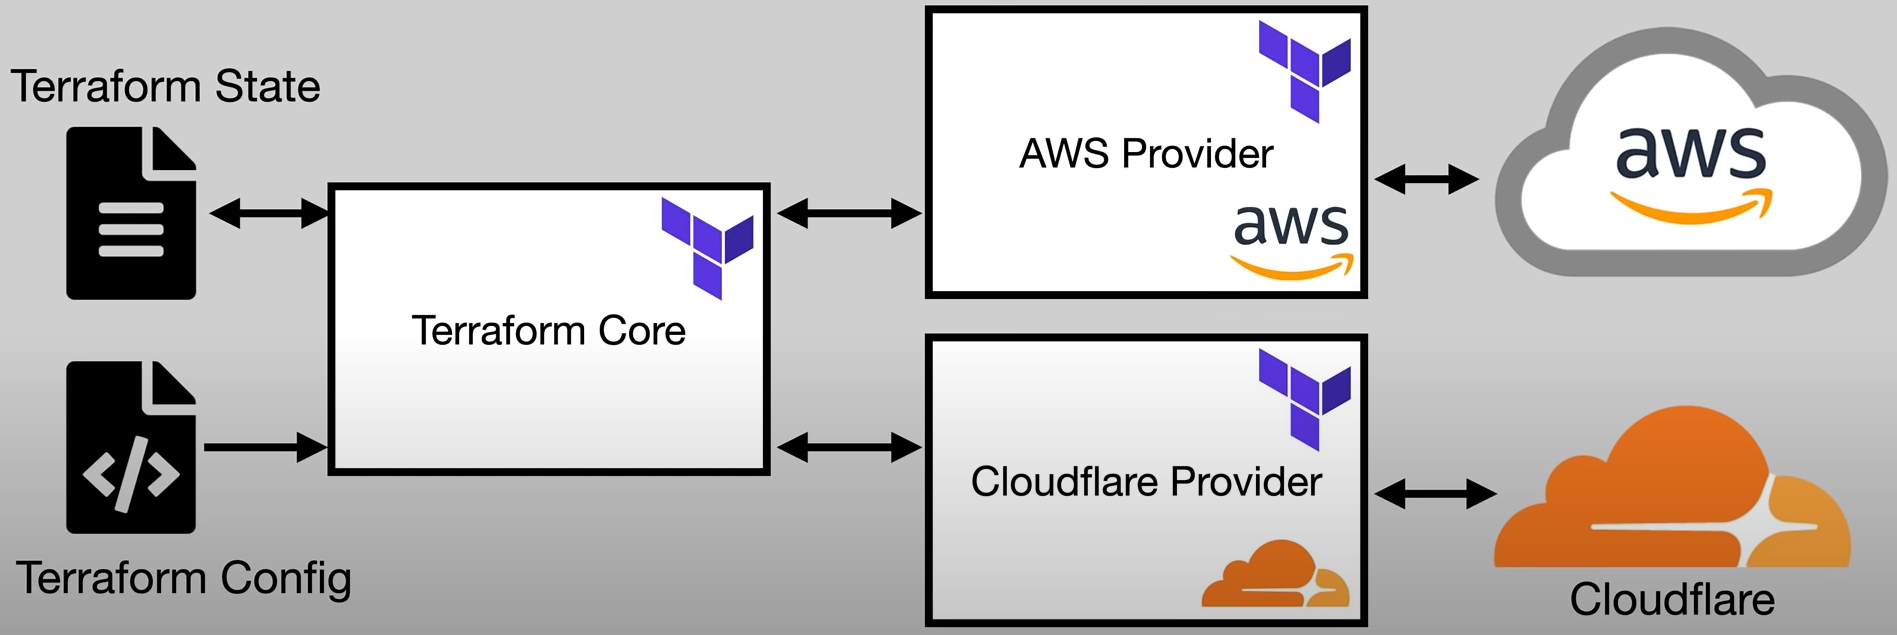
Terraform is an open-source infrastructure as a code tool created by HashiCorp for building, changing, and versioning infrastructure safely and efficiently. It enables defining an infrastructure using application software best practices. Along with that, it is compatible with many clouds and services like AWS, Azure, Kubernetes and so on. The code is written in HashiCorp configuration language in a file that has .tf extension.

Providers
In Terraform, a provider is a plugin that allows us to talk to a set of APIs. For instance, to interact with AWS, we have to download the AWS provider, similarly, to interact with Kubernetes, we have to download the Kubernetes provider. Refer to terraform docs to take a look at all available providers.
Below is the sample code to define an AWS provider, note that this is not the recommended way to set up an AWS provider since we have hard-coded the access key and secret key in our file.
provider "aws" {
  region = "us-east-1"
  access_key = "<access_key>"
  secret_key = "<secret_key>"
}
Resources
Resources are the most important element in the Terraform language. Each resource block describes one or more infrastructure objects, such as virtual networks, compute instances, or higher-level components such as DNS records.
The great thing about Terraform is that it provides the same syntax for all the providers i.e
resource "<provider>_<resource_type>" "name" {
  config options.....
  key = "value"
}
Where config options are various configurations for setting that particular resource which is defined using key-value pairs. For instance, to deploy an EC2 instance on AWS with type t2.micro, we would have the following resource in our file
resource "aws_instance" "my-first-server" {
    ami = "ami-052efd3df9dad4825"
    instance_type = "t2.micro"
}
.tfstate file
This file represents all the states in Terraform. It keeps track of all the changes in the resources, hence, it is crucial for the functionality of Terraform. It can contain sensitive information in plain text like passwords hence it should never be checked out in a version control system like git.
We should use Terraform Cloud or self-managed services like AWS S3 to store the state files in an encrypted manner which brings us to understand local vs remote backend.
Local backend
The state file is stored locally on the system, it is unencrypted and may contain sensitive data. Collaboration is not possible and it is an overall manual approach.
Remote backend
The state file is stored remotely on cloud solutions in an encrypted manner. Collaboration is possible along with setting up automated CI/CD pipelines. The only downside to it is its increased complexity. We can define the remote backend for Terraform cloud as follows.
terraform {
  backend "remote" {
    organization = "xyz"
  }

  workspaces {
    name = "my-project"
  }
}
Basic commands
terraform init
It is used to initialize the Terraform project. It looks for all the providers in all config files in the current directory and downloads the necessary plugins inside .terraform folder.
terraform plan
It is used to do a dry run of the code. It tries to simulate the configuration and tells us about any errors or missing code. It also tells us which resources will be added, deleted, changed or remain unchanged on the specified provider. It is highly recommended to run this command before terraform apply to avoid any errors.
terraform apply
It is used to apply the configuration. It asks for a confirmation before applying the whole config file.
If we got tired of entering yes every time we run terraform apply or terraform destroy, we can use the --auto-approve tag
Variables
Input variables
We can define input variables in the config file as follows
variable "subnet_prefix" {
  description = "cidr block for the subnet"
  default = "10.0.2.0/24"
  type = string
}
They can be accessed as var.<name>, default value like the name suggests is the default value when we don't assign any value to it, type = any means any data type is accepted.
Output variables
We can specify certain values in the output block which are printed when the config file is applied
resource "aws_eip" "one" {
  vpc = true
  network_interface = aws_network_interface.web-server-nic.id
  associate_with_private_ip = "10.0.1.50"
  depends_on = [ aws_internet_gateway.gw, aws_instance.web-server-instance ]
}

output "server_public_ip" {
    value = aws_eip.one.public_ip
}
In the above example, upon applying the config file, the public IP of NIC will be printed on the terminal.
Always run terraform refresh to check the value of output blocks written in the config file. It will show the value without accidentally making changes to the current state.
Local Variables
These are temporary variables within the scope of the function. We can define and access local variables in the config file as follows
locals {

  ec2_tags = {
    service_name = "My Service"
    owner = "NomanAziz"
  }
}

resource "aws_instance" "example" {
  ...

  tags = local.ec2_tags
}
Closing remarks
This is the end of part 1 of Terraform series, part 2 will cover some advanced features of Terraform like managing resources, variables usage, expressions, functions and so on. Stay tuned!
